
MyArcade Gamestation Pro: Flashing
Overview
There’s a few ways to flash the SPI flash on the MyArcade Gamestation Pro. They are as follows:
| Method | Minimum Required OS State | Difficulty |
|---|---|---|
| MASKROM Flashing w/ Reset Switch | Working U-Boot Partition | Moderate |
| MASKROM Flashing w/ Short to Ground | No requirements | Difficult |
| SD Card Flashing | Fully-working OS on version 1.3.0 | Easy |
MASKROM Flashing w/ Reset Switch
This is the method officially used by MyArcade. You’ll want to visit their site to get started on this. The firmware download can be found there as well as flashing tools and instructions for Windows users. Linux and Mac users get no official instructions.
The process is as follows:
- Download the ZIP file provided.
- Unzip using your tool of choice.
- Install the driver file from folder 1.
- Open the installer in folder 2. Accept any warnings from User Account Control.
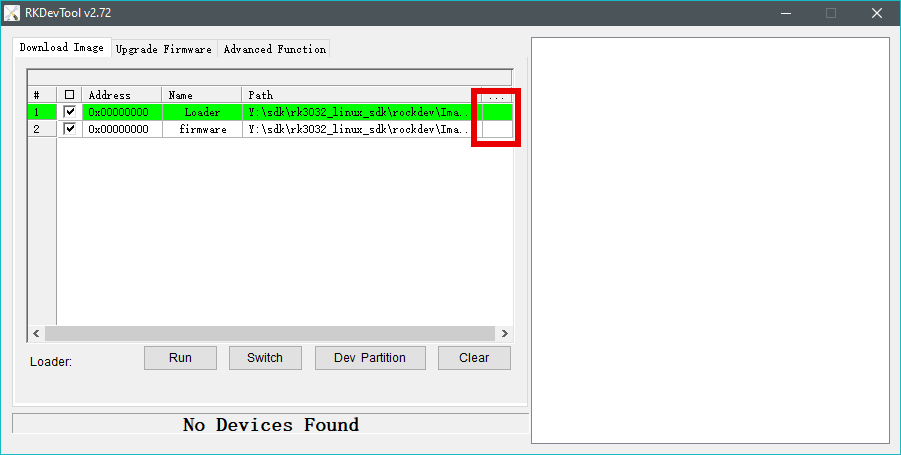
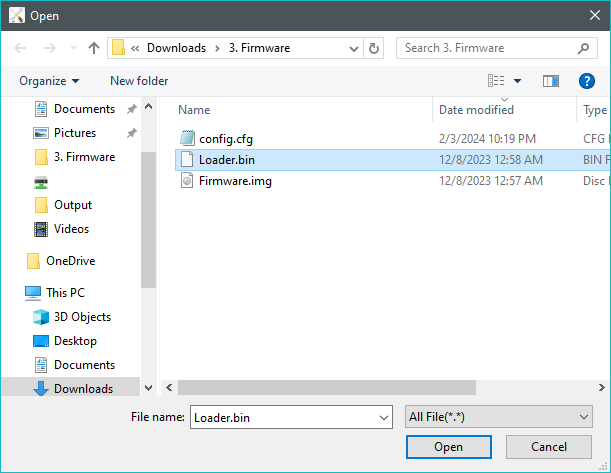
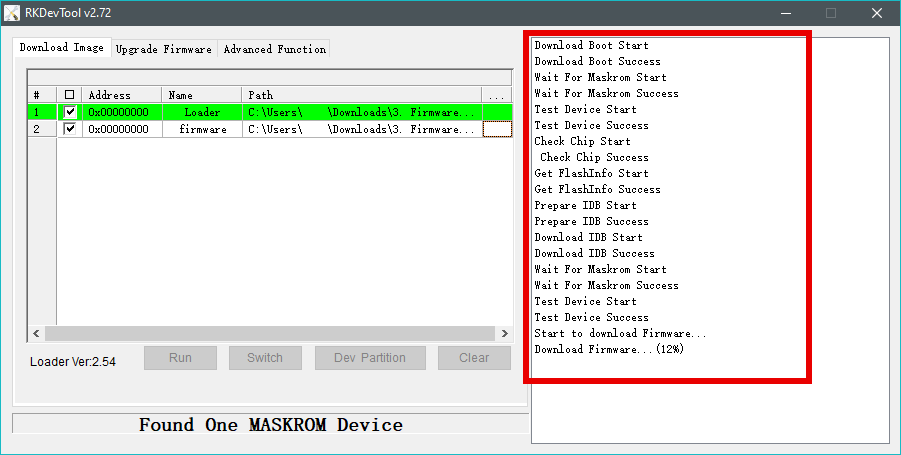
- Load in the firmware by clicking the rightmost
box in each row on the default screen. They’re highlighted
in red in the picture below. Select
the required files from folder 2 with the file
picker dialouge.
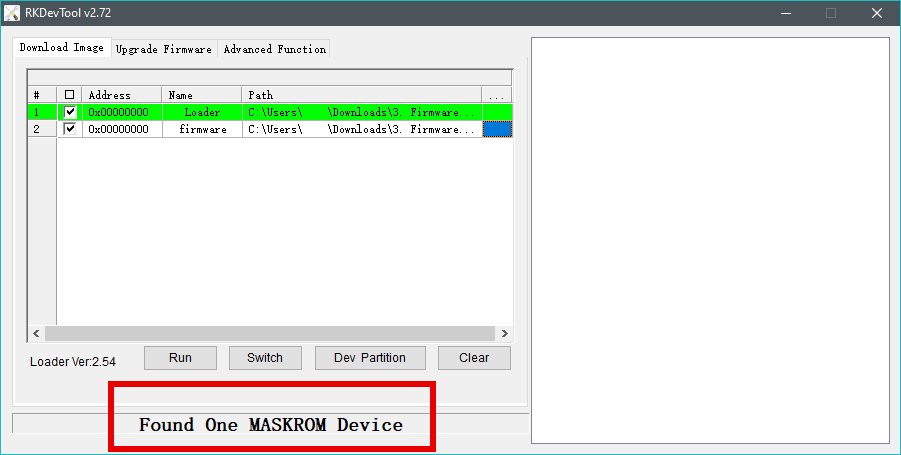
- Plug in the device and turn it on while holding the reset button
on the back. If you don’t see a connection like shown below in the software,
try these troubleshooting steps:
- Make sure you’ve plugged the USB cable into the computer.
- If the lights fully turn on, try again. When entering MASKROM mode, the lights only turn on for a fraction of a second, if at all.
- If the device only momentarily connects, keep trying. Try holding the button longer.
- If the computer makes no indication that the device has connected, try a different USB C cable. The one it ships with does not carry data and thus won’t work with this process.
- Ensure that the device has been turned on with the power switch up top.
- Try holding down the the reset button down for roughly
3 more seconds after applying power to the console. Removing
too soon will allow the console to boot up instead of entering
MASKROM mode.
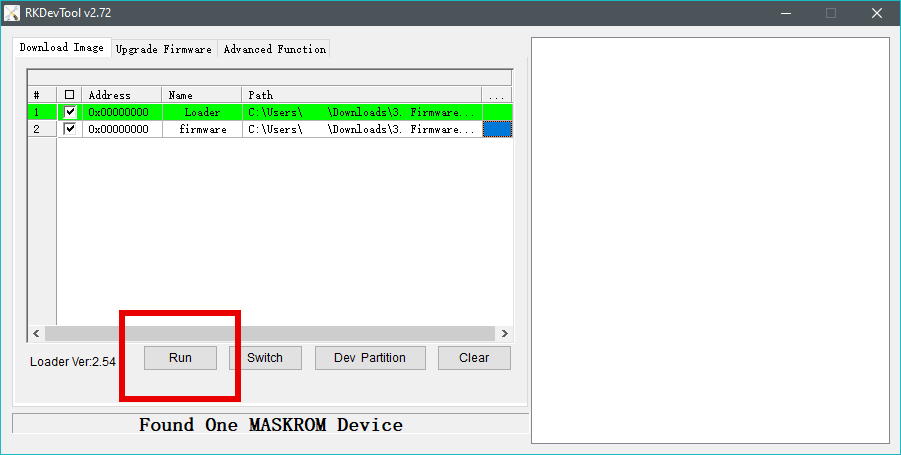
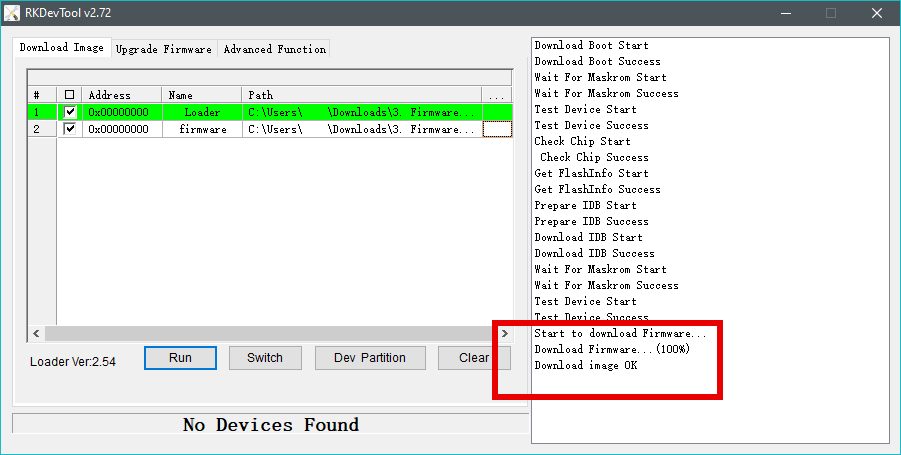
- Run the flashing software once the device
appears in the flashing software by clicking the
“Run” button. Logs will appear on the right informing
you of the installation progress.
This is unofficial, but Linux users may also flash their Gamestation Pros. Users will need to download rockchip-linux/rkdeveloptool and build the tool themselves from source. There’s also a package for it in the AUR if you’re on Arch, but I haven’t tested this. If you get an error such as follows:
main.cpp: In function ‘bool _Z9mergeBootv.part.0()’:
main.cpp:1493:43: error: ‘%s’ directive output may be truncated writing up to 557 bytes into a region of size 5 [-Werror=format-truncation=]
 1493 |         snprintf(buffer, sizeof(buffer), "%s", chip);
      |                                           ^~
......
 1534 |                 chipType = convertChipType(chip + 2);
      |                            ~~~~~~~~~~~~~~~~~~~~~~~~~
In file included from /usr/include/stdio.h:894,
                 from DefineHeader.h:3,
                 from main.cpp:11:
/usr/include/x86_64-linux-gnu/bits/stdio2.h:71:35: note: ‘__builtin_snprintf’ output between 1 and 558 bytes into a destination of size 5
   71 |   return __builtin___snprintf_chk (__s, __n, __USE_FORTIFY_LEVEL - 1,
      |          ~~~~~~~~~~~~~~~~~~~~~~~~~^~~~~~~~~~~~~~~~~~~~~~~~~~~~~~~~~~~
   72 |                                    __glibc_objsize (__s), __fmt,
      |                                    ~~~~~~~~~~~~~~~~~~~~~~~~~~~~~
   73 |                                    __va_arg_pack ());
      |                                    ~~~~~~~~~~~~~~~~~
cc1plus: all warnings being treated as errors
make[1]: *** [Makefile:491: main.o] Error 1
Edit your Makefile and remove any occurrences of “-Werror”. This flag essentially tells the compiler to treat any warnings as errors. This isn’t ideal, but it should get the job done.
Once you’ve got rkdeveloptool built and installed, flash the firmware like so:
Load the firmware file:
rkdeveloptool db Loader.bin
Then, flash the file:
rkdeveloptool wl 0 Firmware.img
You may need to run these commands with sudo to get them to work on some distros.
I don’t personally own a Mac so I can’t speak on the process for flashing from OSX. However, the instructions should be the same as with Linux.
MASKROM Flashing w/ Short to Ground
In the event that the data on the SPI NAND is corrupt, a user may not be able to use the previous method to boot into MASKROM mode as UBoot is (presumably) what watches for the reset button being held, then initializes MASKROM mode. Fortunately, there’s another way to enter MASKROM mode. In the event that the SoC does not see any storage available on boot, the SoC will load itself into MASKROM mode. That is to say, if we forcibly stop the SPI flash chip, the SoC will put itself into MASKROM mode all on its own without the need for any functioning OS on the NAND. This can be used to unbrick a device whos diagnosis is a faulty firmware.
So, we need a method to forcibly stop the SPI flash chip. Fortunately, this is quite easy to do and is only slightly invasive a process. The steps are as follows:
- Download all software from MASKROM Flashing w/ Reset Switch. Open the software and load in the Loader and Firmware file.
- Remove all screws from the bottom of the device. Three are under the rubber feet. You can just peel these off.
- Disconnect the ribbon cable running between the black motherboard and the green daughterboard.
- Remove all screws from the two boards and remove them from the device.
- Reconnect the ribbon cable with the now removed boards. Flip the two so they both are face up.
- Short CLK on the Winbond SPI flash chip to ground like so:
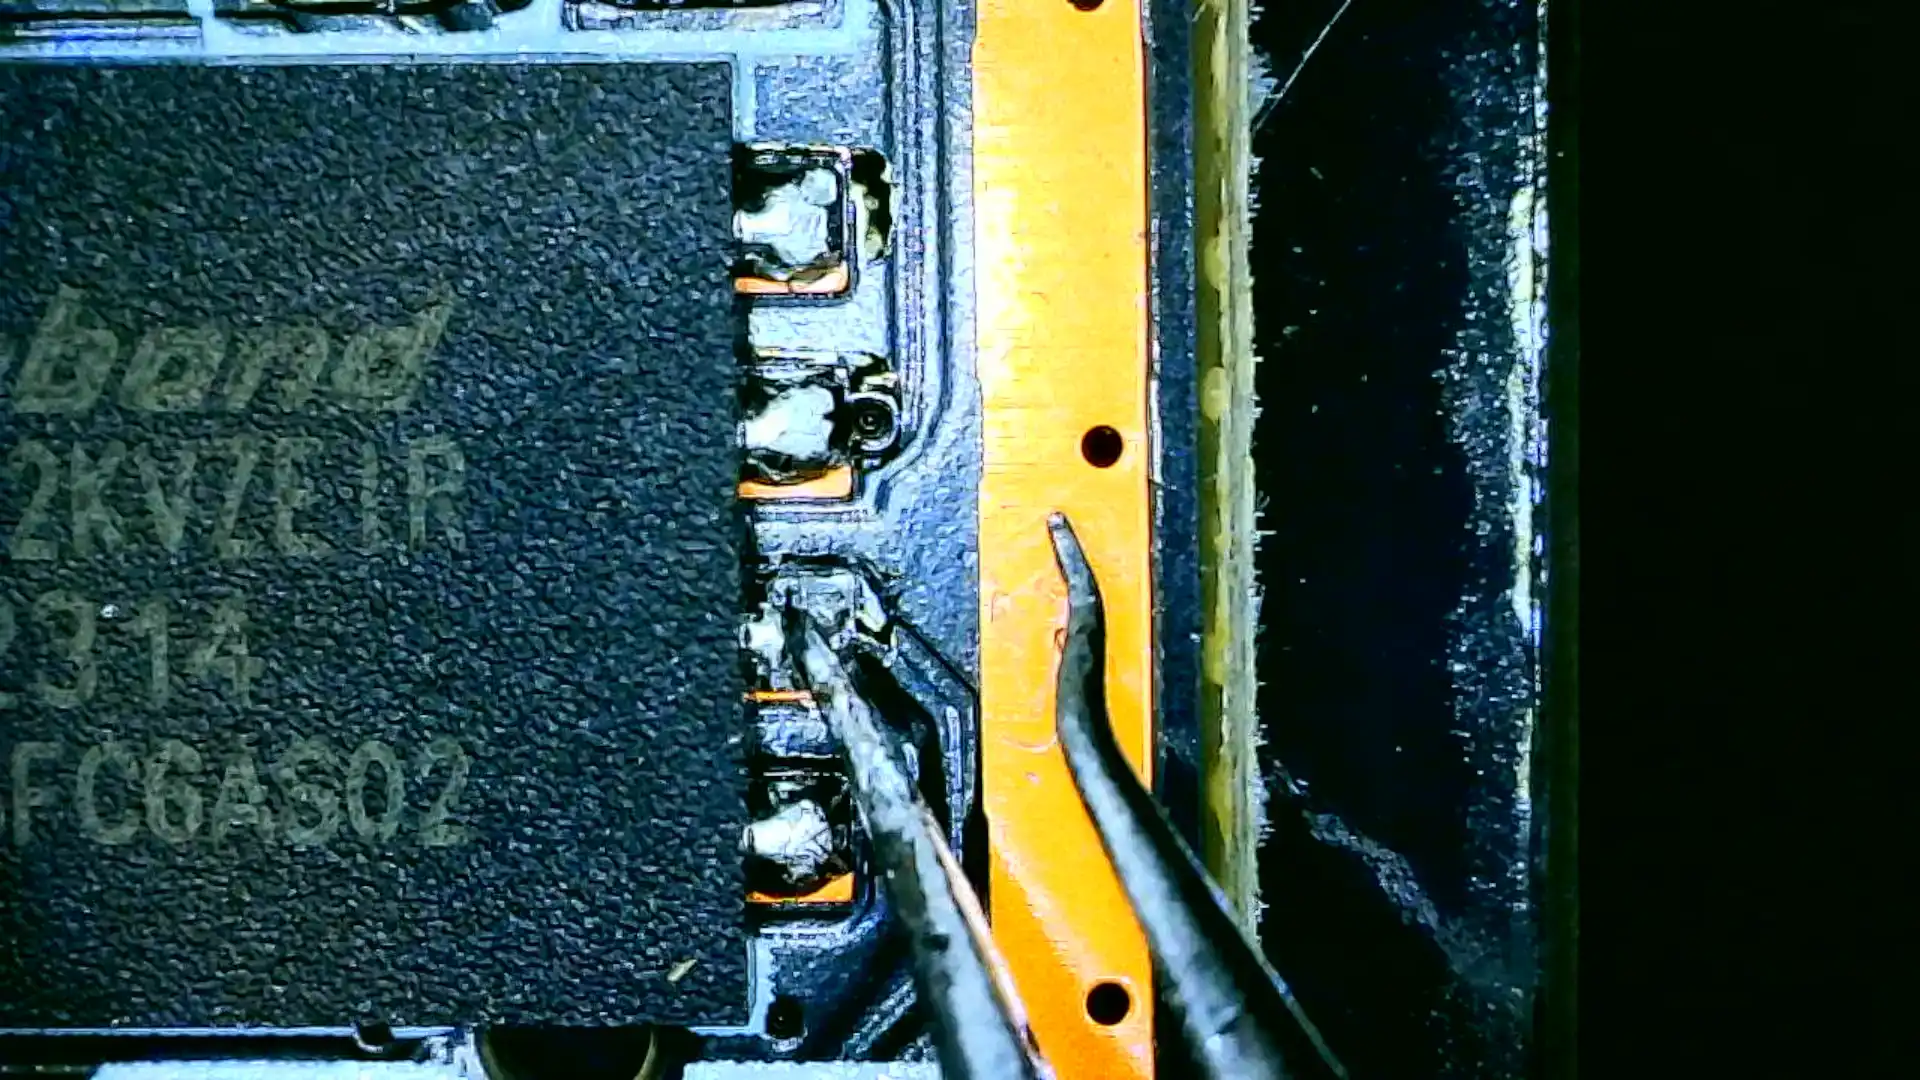
- Keep holding the tweezers like this. Connect the unit to your PC and hold the tweezers for about five seconds. Then, remove the tweezers from the unit.
- Check if the device appears in the flashing software. If it doesn’t, remove power and try again. Check that the power switch on the daughter board is set to on.
- Proceed with flashing the device as specified in the previous instructions.
If the device appears in LOADER mode rather than MASKROM mode while following these instructions, you may have too much resistance between ground and CLK. Find something that will provide less resistance.
SD Card Flashing
This method is by far the easiest so long as you meet the following criteria:
- Your device has a working copy of firmware 1.30 installed1
- You have a MicroSD card of 512MB or larger
- You have a copy of Gamestation Pro firmware that has been specifically created for this flashing method - The initial release of the 1.30 firmware has not been created with this flashing method in mind. Instructions to create this file can be found on the update.img page
These are the steps:
- Ensure that your MicroSD card is FAT32 formatted.
- Copy the firmware file to the root directory, i.e. not in any folders
on the SD card, and ensure that it is named
update.img. - Start the console with the SD card removed. Wait for the console to reach the home screen.
- Insert the SD card. When prompted, answer that you would like to upgrade the firmware.
- Wait for the firmware to install.
- Remove the SD card and then reboot when prompted.
-
This is unverified that firmware 1.30 is the only firmware that works with this method. If you have a Gamestation Pro on original firmware, it would be much appreciated if you could verify if these steps work on the unit that has yet to be updated to firmware 1.30. Please contact [email protected] if you can validate this. ↩